


SPECIAL RELEASE - New 250th Celebration Designs
-


 New
NewAmerica 250th Anniversary Stamp
From $5.99Unit price /Unavailable -


 New
NewAmerica 250th Anniversary - Fireworks
From $5.99Unit price /Unavailable -


 New
NewAmerica 250th Anniversary - America the Bee-utiful
From $5.99Unit price /Unavailable -


 New
NewAmerica 250th Anniversary Star Ornament (In-the-Hoop)
From $3.99Unit price /Unavailable -


America 250th Anniversary Retro Truck
From $6.99Unit price /Unavailable


Special Price
$29.99
Doodle Design Pack
Popular doodle-style designs in a NEW pack—60 designs, just $29.99!

19 Designs for
$19.99
U.S. Patriotic Quilt Pack
Get 19 mix-and-match designs in 3 sizes at a limited-time price—a $113 value, only $19.99!

FREE GIFT
with $5 purchase
Free Patriotic Quilt Label
Finish off any of your Americana projects with this quilt label—yours FREE with any $5 order!
Save 60% on 1000s of Flower Designs!
SEE THEM ALL


Get Inspired by What's NEW
We're always crafting up new designs and ideas at Embroidery Library to keep you inspired. See the latest projects and designs perfect for your next crafting afternoon!
-


 NewFrom $29.99
$117.40Unit price /Unavailable -


 NewFrom $5.99Unit price /Unavailable
 -


 PDF IncludedNew
Primitive Americana Truck (Heirloom Applique)
From $5.99Unit price /Unavailable -


 NewFrom $10.49
$20.98Unit price /Unavailable -


 New
NewFloral Diamonds Quilting Design Pack
From $7.18$17.94Unit price /Unavailable -


 NewFrom $9.98
$24.95Unit price /Unavailable -


 NewFrom $4.99Unit price /Unavailable
 -


 NewFrom $3.99Unit price /Unavailable
 -


 NewFrom $6.99Unit price /Unavailable
 -


 NewFrom $6.99Unit price /Unavailable
 -


 New
NewLace Edge Americana Stamp Coasters (In-the-Hoop) Design Pack
From $9.58$23.96Unit price /Unavailable -


 NewFrom $5.99Unit price /Unavailable
 -


 NewFrom $5.99Unit price /Unavailable
 -


 New
NewAmericana Half Circle Bunting (In-the-Hoop)
From $2.80$6.99Unit price /Unavailable -


 New
NewSerene Ocean Creatures (Embossed) Design Pack
From $7.98$19.96Unit price /Unavailable -


 New
NewBeach Time Coaster (In-the-Hoop)
From $4.99Unit price /Unavailable -


 New
NewThe Beach Is My Happy Place Stamp
From $5.99Unit price /Unavailable -


 New
NewBoring Without Me Flora Flamingo
From $5.99Unit price /Unavailable -


 New
NewPooh Bear Sketches Design Pack
From $8.78$21.94Unit price /Unavailable -


 PDF IncludedNew
Pooh Bear and Friends Design Pack
From $26.45$52.89Unit price /Unavailable -
New
America 250th Anniversary Stamp
From $5.99Unit price /Unavailable -


 NewFrom $7.99Unit price /Unavailable
 -


 NewFrom $11.18
$27.96Unit price /Unavailable -


 New
NewFlora & Fauna Trivets (In-the-Hoop) Design Pack
From $11.18$27.96Unit price /Unavailable -


 New
NewStrawberry Market Sign Panel Set
From $7.49$14.98Unit price /Unavailable -


 New
NewWelcome Hummingbird Garden Flag
From $10.49$20.98Unit price /Unavailable -


 New
NewDays of the Week Florals Design Pack
From $13.57$33.93Unit price /Unavailable -


 NewFrom $6.99Unit price /Unavailable
 -


 New
NewSpringtime Quilt Hexagon (Applique) Design Pack
From $13.58$33.94Unit price /Unavailable -


 NewFrom $5.99Unit price /Unavailable
 -


 New
NewPrairie Quilt Design Pack (Applique)
From $6.78$16.94Unit price /Unavailable -


 New
NewHola Mola Design Pack - Vault Edition
From $57.06$142.66Unit price /Unavailable -


 New
NewGranny Square Coaster (In-the-Hoop)
From $5.99Unit price /Unavailable -


 New
NewLace Edge Floral Mug Rug (In-the-Hoop)
From $2.80$6.99Unit price /Unavailable -


 New
NewBlank Lace Edge Oval Mug Rug (In-the-Hoop)
From $4.99Unit price /Unavailable -


 New
NewHandmade Humor Quilt Labels Design Pack
From $7.18$17.94Unit price /Unavailable -


 New
NewMajestic Gaze Kitten with Butterfly
From $5.99Unit price /Unavailable -


 PDF IncludedNew
Build a Crafty Bookshelf Quilt Design Pack
From $26.46$52.91Unit price /Unavailable -


 New
NewGarden Seed Packet Coasters (In-the-Hoop) Design Pack
From $7.98$19.96Unit price /Unavailable


Choose the next project that's right for you
-

IN-THE-HOOP COASTERS
QUICK PROJECT
These popular designs stitch up completely in-the-hoop—perfect for gifts or a decor refresh. -

MATCHING KITCHEN SETS
AFTERNOON PROJECT
Coordinating mug rugs, trivets, coasters, and towels make great gifts for any occasion. -

Blooming Welcome
WEEKEND PROJECT
Open the door to summer fun with this blooming "Welcome" wall hanging.


MAKER EDITION
Maker Edition products are more than just embroidery designs—they're a complete crafting experience!
When you download, you'll get all the digital embroidery files you need to complete the project—plus a PDF Maker's Guide complete with fabric requirements, step-by-step instructions, and everything you need to go from embroidery designs to unique, high-quality creations.
-
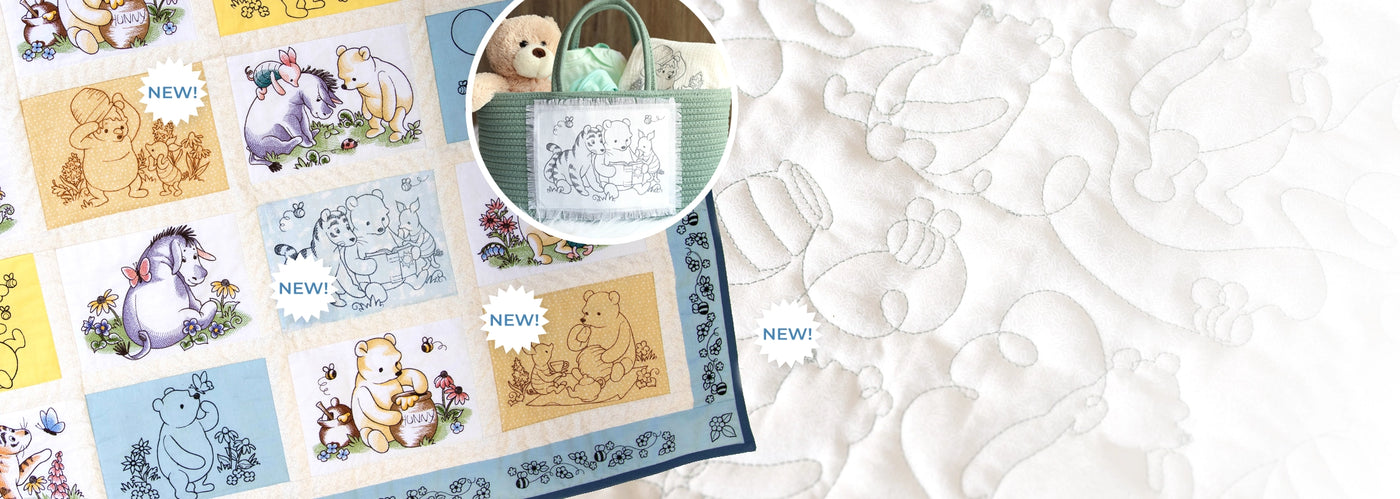
PDF IncludedNew
Pooh Bear and Friends Design Pack
From $26.45$52.89Unit price /Unavailable -


 PDF IncludedNew
Woodland Animals Quilt Design Pack
From $35.44$70.88Unit price /Unavailable -


 PDF IncludedNewFrom $24.95
$49.89Unit price /Unavailable -
PDF IncludedNew
Build a Crafty Bookshelf Quilt Design Pack
From $26.46$52.91Unit price /Unavailable -


 PDF IncludedNew
Primitive Americana (Heirloom Applique) Design Pack
From $24.46$48.91Unit price /Unavailable


Stitcher Spotlight - Anneth
Anneth used this playful patriotic pup to decorate her dog's food container. Take a closer look and get inspired!
Want to submit your own project? Click here!
Stitchers Showcase
See the latest inspiring creations from stitchers like you


Trending Designs & Project Ideas


Artist-Crafted Machine Embroidery Designs
Express your creativity with unique machine embroidery designs you won’t find anywhere else! Files are available for instant download in all embroidery machine file formats, for Brother, Baby Lock, Janome, Bernina, Husqvarna Viking, Pfaff, Singer, and more embroidery machines. Check back often for sales and new design releases!